Sawtoothing (Jagged Edges) in Screen Printing: Causes, Mechanics, and What Actually Fixes It
Why straight edges print as staircases in screen printing: the mesh-grid mechanism, washout anchoring, EOM gasket sealing, the 22.5° mesh angle, and which press parameters can soften sawtoothing when you cannot remake the screen.
Sawtoothing is the defect where an edge that is perfectly smooth in your artwork prints as a regular staircase of tiny teeth. It is one of the most misunderstood defects in the shop, because it looks like an ink-flow problem but is almost always made in the screen room, not on the press.
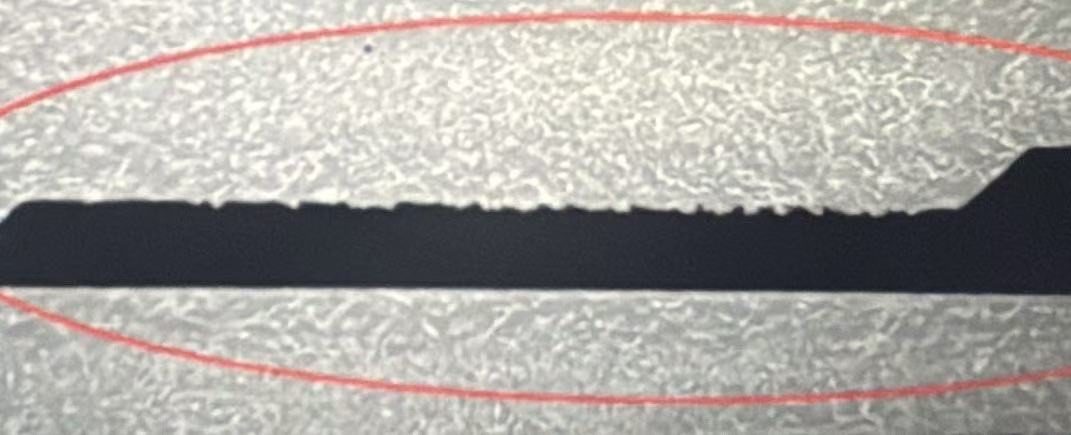
This guide walks through the mechanism step by step, then covers what press parameters can and cannot do when remaking the screen is not an option.
First, confirm it is really sawtoothing
Sawtoothing and bleeding (feathering) both ruin edges, but they are different defects with different fixes:
- Sawtoothing is periodic: the teeth repeat at exactly the mesh pitch, on every edge, in the same rhythm.
- Bleeding is irregular: random fuzzy spikes, usually worse where ink pools.
The decisive test: take the screen off the press and hold it against a light. If you can see the staircase already in the stencil openings, the defect is baked into the screen. No press adjustment will remove it — it can only make it more or less visible.
The root mechanism: your mesh is a grid
A screen is not a continuous sheet. It is a grid of square openings separated by threads. When the film edge crosses the mesh at any angle that is not perfectly parallel to a thread family, the edge cuts across openings mid-cell.
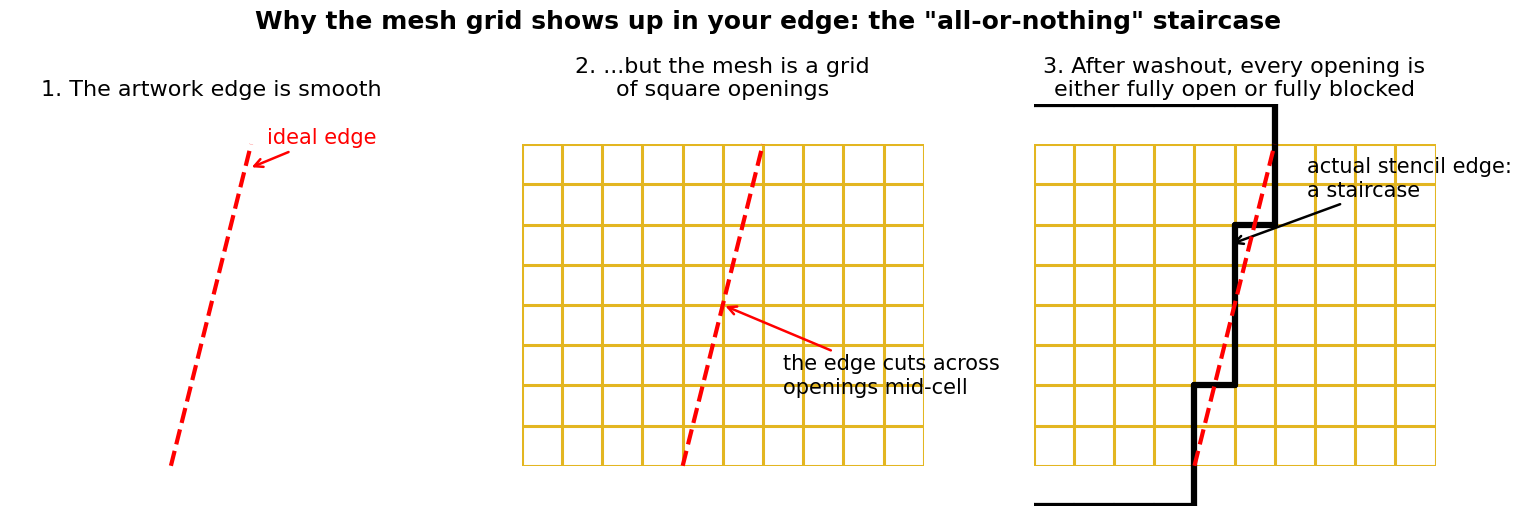
Why “fully open or fully blocked”? After coating and exposure, the emulsion boundary can in principle sit in the middle of an opening. The binary outcome is created at washout.
Washout: why the edge snaps to the nearest thread
Emulsion is anchored where it wraps around a thread. An emulsion edge that ends mid-opening is a free edge with nothing to hold onto. When the water jet hits it during washout, that free edge dissolves or tears back until it reaches the nearest thread — the same way a piece of tape peeling off a wall stops at the first thing it is stuck to.
Top-view animation: right after exposure, the hardened emulsion (dark) still follows the film edge (red dashes), cutting across openings mid-cell. During washout, every bit of emulsion that has no thread to anchor to washes away, retreating to the nearest thread. The final stencil edge is a staircase — each step is exactly one mesh opening.
The result: every opening along the edge makes a binary choice, and the stencil boundary snaps onto the mesh grid. That grid is the staircase you see in the print. This is why sawtoothing is created at screen-making time, and why its teeth always match the mesh pitch.
EOM: the gasket that decides whether ink respects the edge
Even a perfectly resolved stencil edge can print ragged if the emulsion layer is too thin. The key variable is EOM — Emulsion Over Mesh: how far the emulsion protrudes below the thread plane on the print side of the screen.
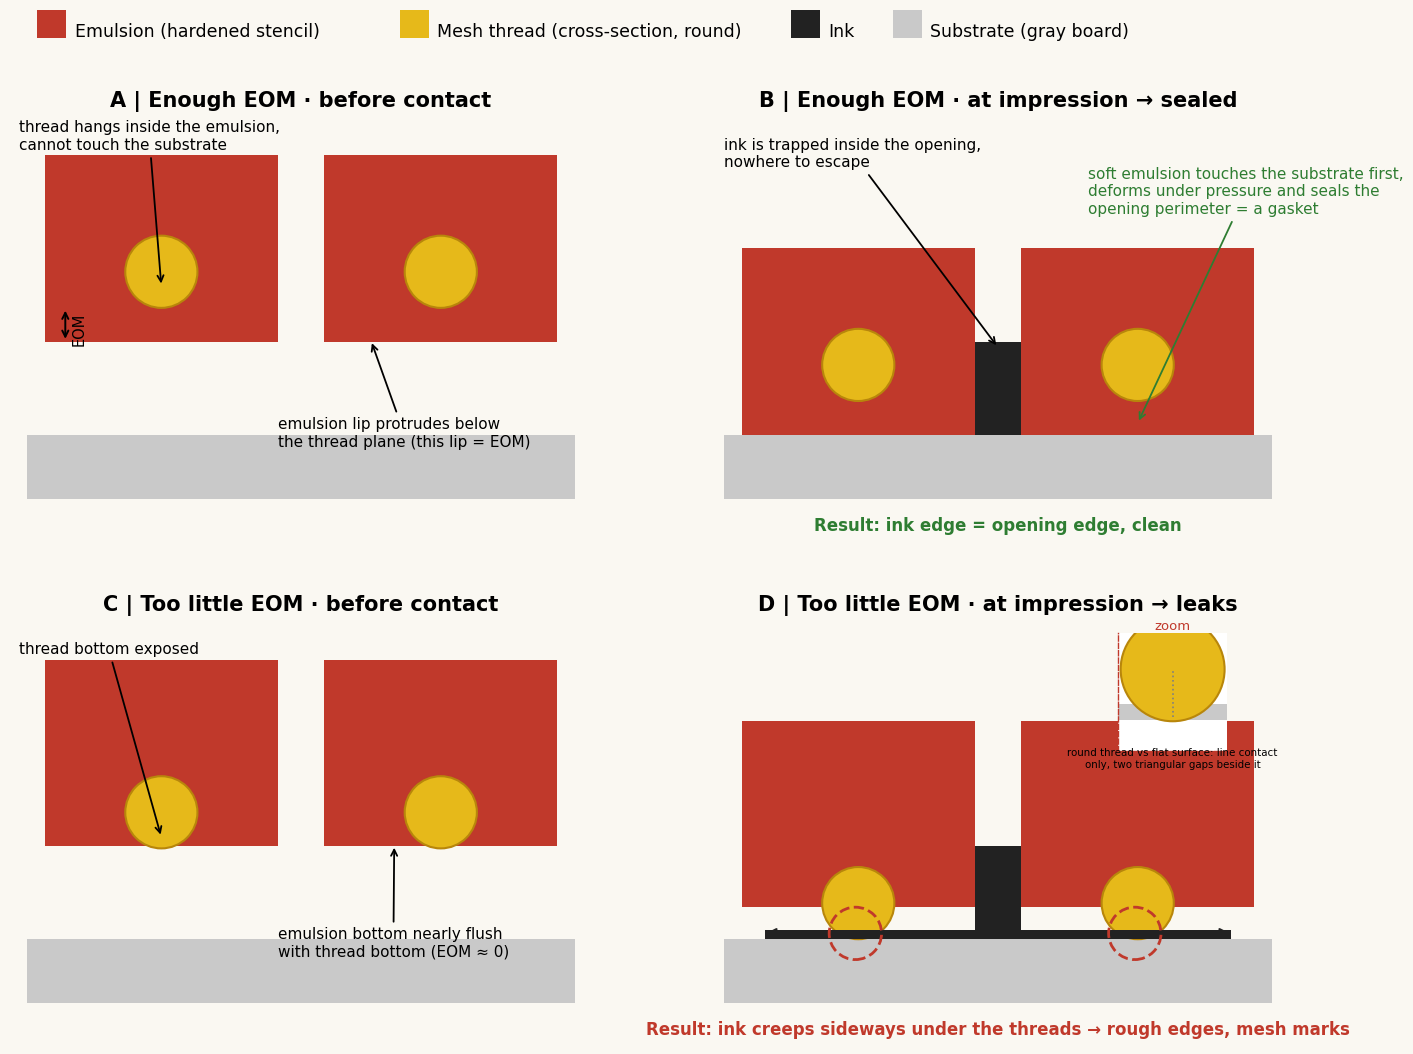
Stencil manufacturers put numbers on this. KIWO recommends an emulsion build-up of roughly 20% of mesh thickness for general printing and about 10% (or a minimum of 4–5 microns of EOM) for fine-detail and UV work.[1] DeFelsko’s measurement guide states the consequence directly: if the emulsion coating is too thin, “it will not provide a proper gasket seal. The ink will bleed underneath the stencil. This will cause the print to have rough looking edges (saw-toothing).”[2]
So there are really two layers to the defect:
- the staircase geometry baked in at washout, and
- ink escaping under the stencil edge because the gasket is missing — which makes every tooth look worse.
Mesh angle: why the industry stretches mesh at 22.5°
The teeth are worst when an edge crosses threads at a shallow glancing angle. Artwork, however, is dominated by horizontal/vertical edges and 45° diagonals — you cannot rotate the artwork to please the mesh. So the industry rotates the mesh instead: screens are stretched with the threads at an angle to the frame, conventionally 22.5°.
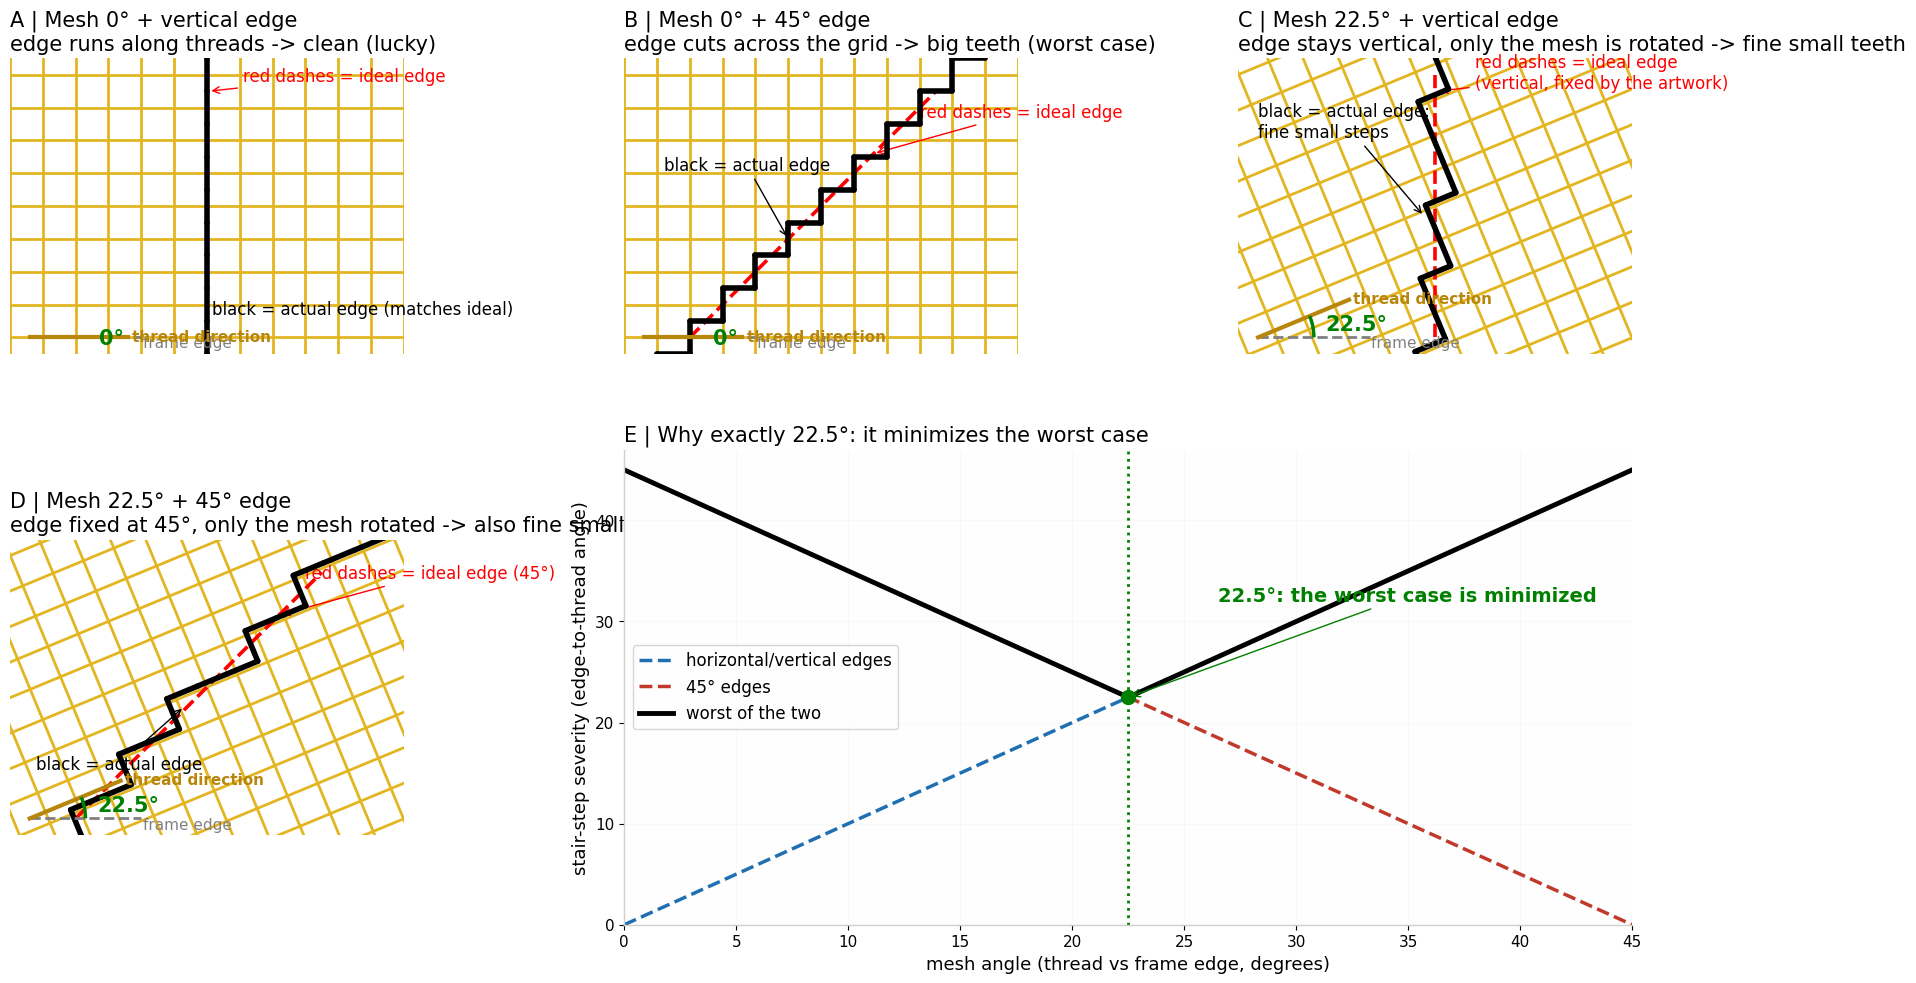
Two honest caveats:
- 22.5° equalizes the damage; it does not eliminate it. Every edge still stair-steps, just with smaller, more uniform teeth. Mesh count (finer mesh = smaller teeth) is what shrinks the teeth themselves.
- The 22.5° convention is well established in pre-press practice — AccuRIP, the most common film-output RIP, defaults all halftone angles to 22.5° to avoid film-to-screen moiré[3] — but it is not sacred. A simulation study on screens for solar-cell metallization (which use a 22.5° screen angle as the industry standard) found that for the extreme fine-line case, 22.5° can actually be a poor choice, and other angles can perform better.[4] If your image is dominated by lines in one single direction, mesh aligned with (or deliberately angled away from) that direction can beat the generic 22.5° compromise.
When you cannot remake the screen: what press parameters can do
Once the stencil exists, the teeth are fixed. The only lever left on press is how faithfully the ink reproduces them. Ink is a liquid between printing and curing, and surface tension levels out features smaller than the ink film is thick. Tooth height is on the order of half a mesh opening — tens of microns — so a thicker ink film with time to level can partially bury the teeth.
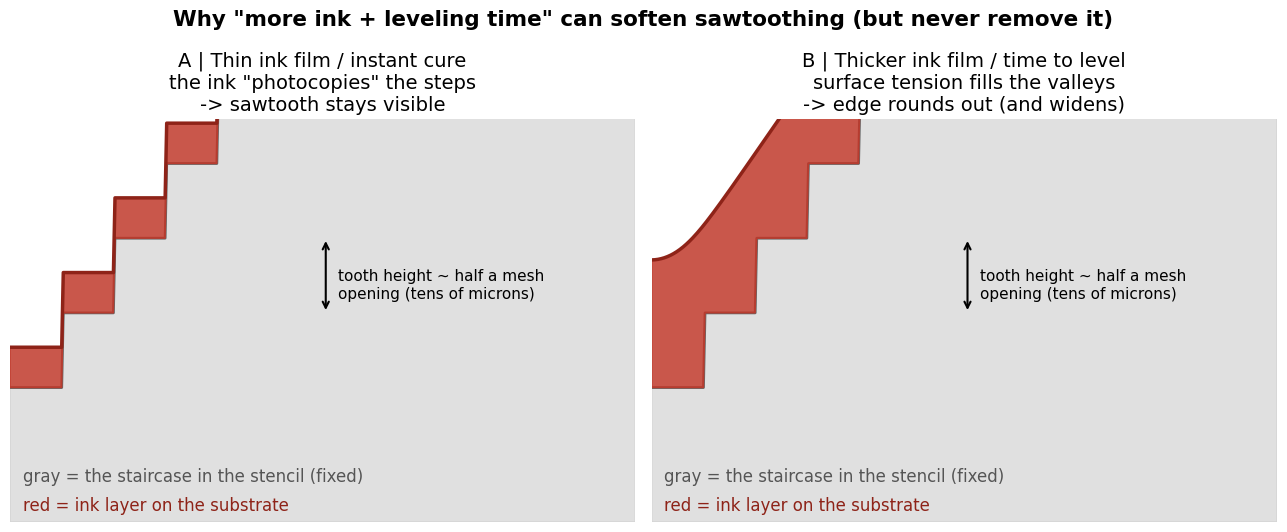
In practice, the knobs that increase deposited ink or leveling time are summarized below. All of them are standard shop-floor levers for ink deposit and edge sharpness — but treat this as a trade-off, not a fix:
| Parameter | Adjustment | Effect on sawtoothing |
|---|---|---|
| Squeegee pressure | Slightly more | More ink deposited, thicker film → better leveling over the teeth |
| Squeegee durometer | Softer blade | Bends deeper into the openings, more ink transfer → same as above |
| Squeegee angle | Lower (more laid-back) | More ink pushed through → thicker film |
| Print speed | Slower | More complete ink transfer and fill of each opening |
| Ink viscosity / temperature | Slightly lower viscosity (or slightly warmer ink) | Flows and levels faster, rounds the teeth more |
| Print pass | Print the same screen twice | Roughly doubles the film, more material to self-level |
| Cure timing | Let solvent ink flash off a few seconds before the dryer | Leveling time before the film is frozen (UV cures instantly — least forgiving) |
| Off-contact | Keep it normal; don’t chase the defect here | Affects release and registration, not the teeth themselves |
- Everything that fills the teeth also makes ink flow sideways everywhere — you are trading sawtoothing for a fatter edge, and one step too far turns into bleeding.
- The tooth spacing (the mesh pitch) never disappears. Under a loupe, the teeth are always still there.
If the specification is “straight, sharp edge,” the honest answer is upstream: finer mesh, correct mesh angle, adequate EOM, and controlled exposure. Press parameters are painkillers, not surgery.
The permanent fix checklist
When you remake the screen, in order of impact:
- Mesh count: finer mesh = smaller openings = smaller teeth. This is the only variable that shrinks the teeth themselves.
- Mesh angle: 22.5° for mixed artwork; align (or deliberately offset) the mesh for single-direction line work.
- EOM: target ~20% of mesh thickness for general work, ~10% (minimum 4–5 µm) for fine detail/UV.[1] Measure it — a stencil thickness gauge pays for itself the first time it catches a bad screen before it reaches the press.[2]
- Exposure and washout discipline: fully cured emulsion resists washout erosion; a gentle, even washout avoids tearing half-anchored edges.
References
- Dave Dennings, KIWO Inc., “Understanding Mesh Geometry, Stencil Resolution, and Measuring Systems for Quality Control.” kiwo.com/s/Understanding-Mesh-Geometry.pdf
- DeFelsko, “Screen Printing — Measurements (mesh, emulsion, stencil thickness).” defelsko.com/resources/screen-printing-measurements-mesh-emulsion-stencil-thickness
- Solutions for Screen Printers (AccuRIP), “Halftone Angles Demystified.” support.solutionsforscreenprinters.com — Halftone Angles Demystified
- “A model for screen utility to predict the future of printed solar cell metallization,” Scientific Reports (2021). pmc.ncbi.nlm.nih.gov/articles/PMC7902611